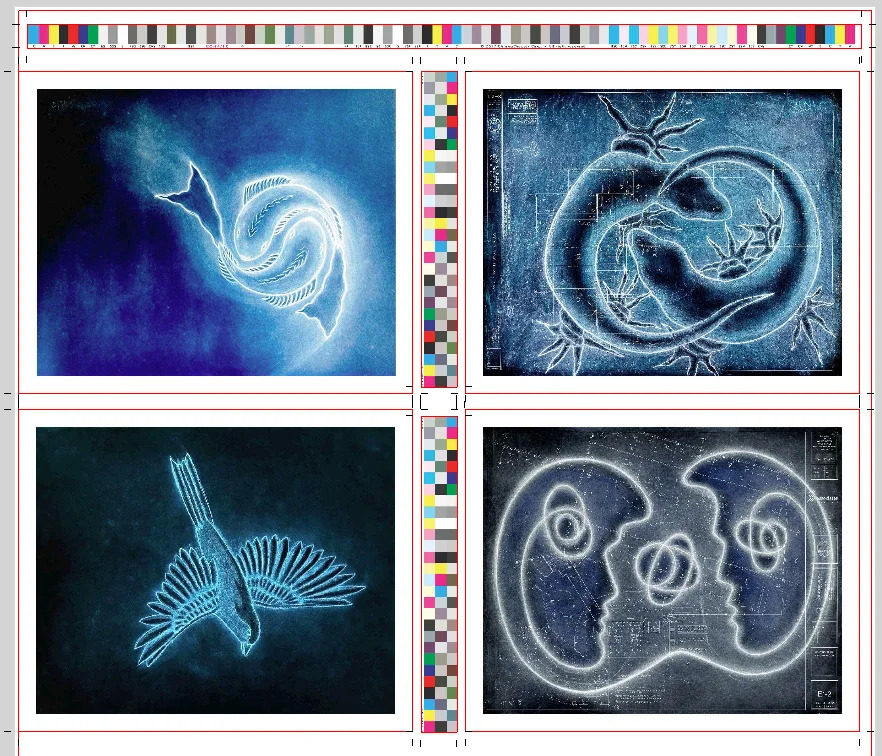
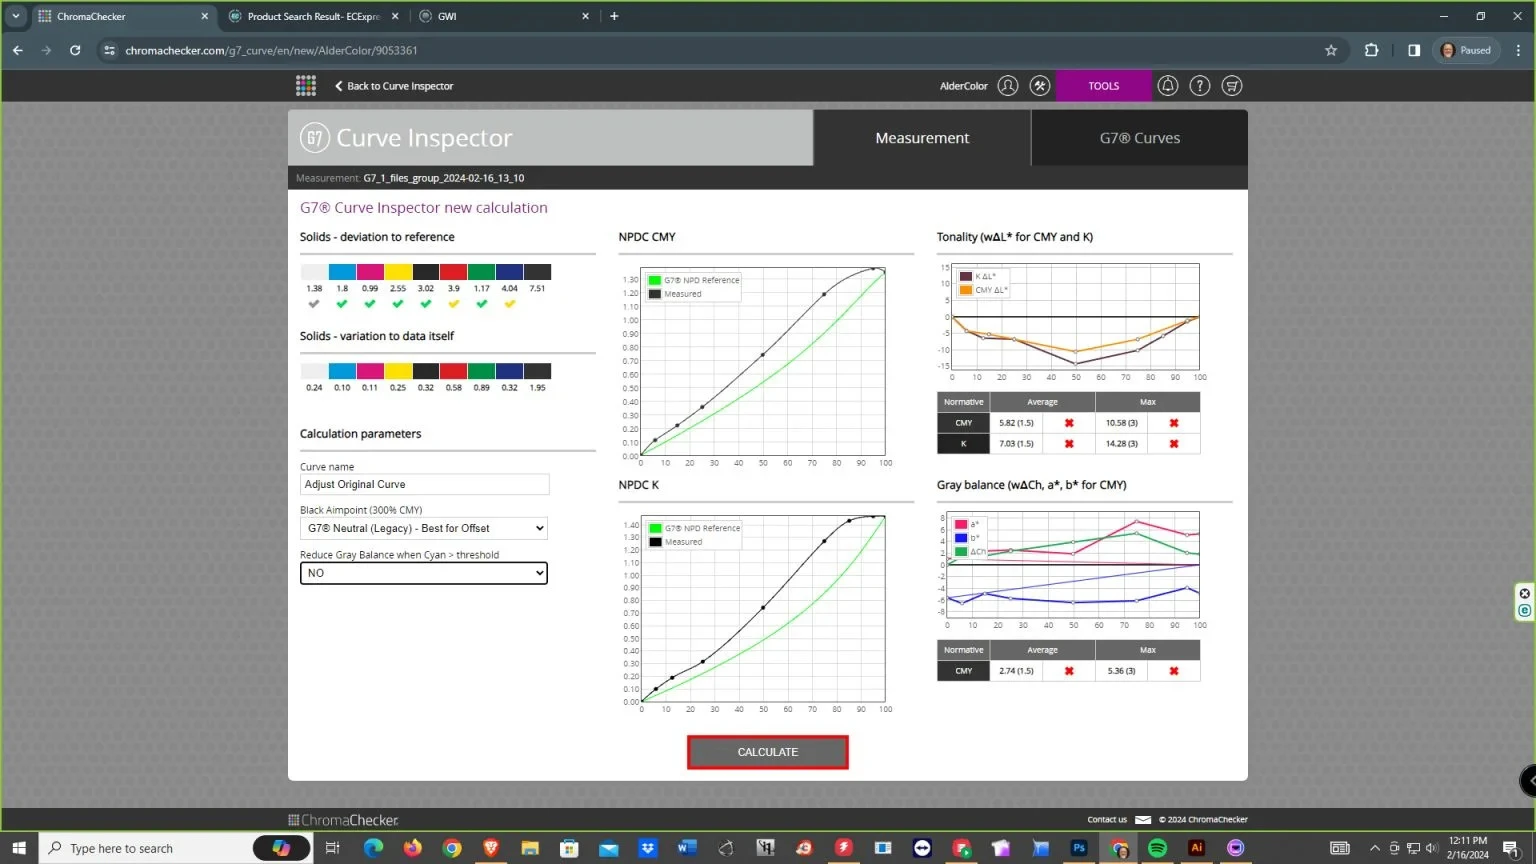
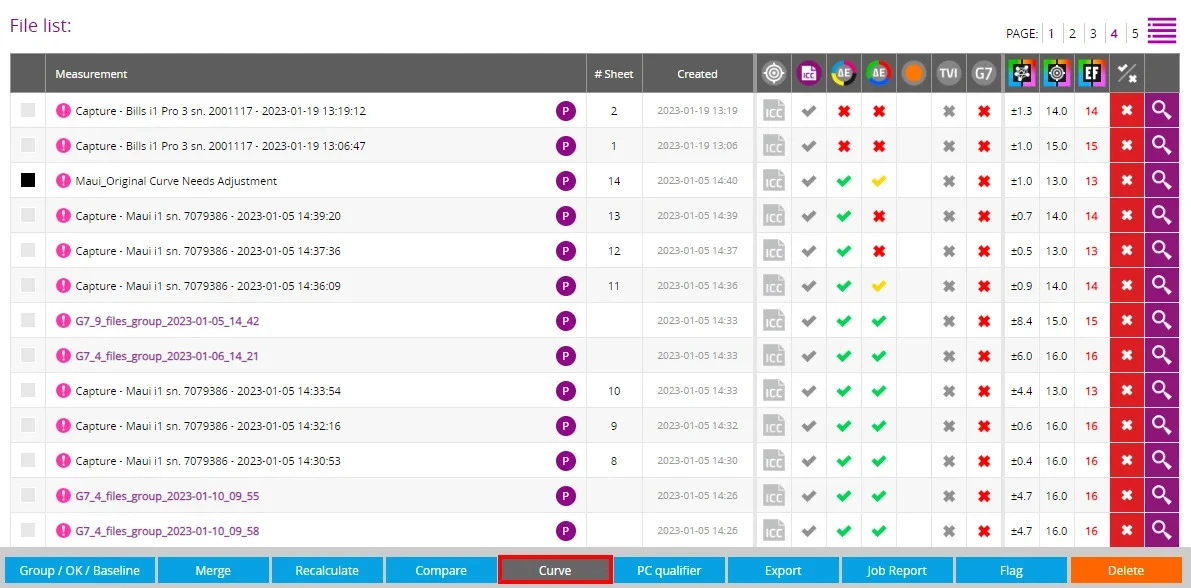
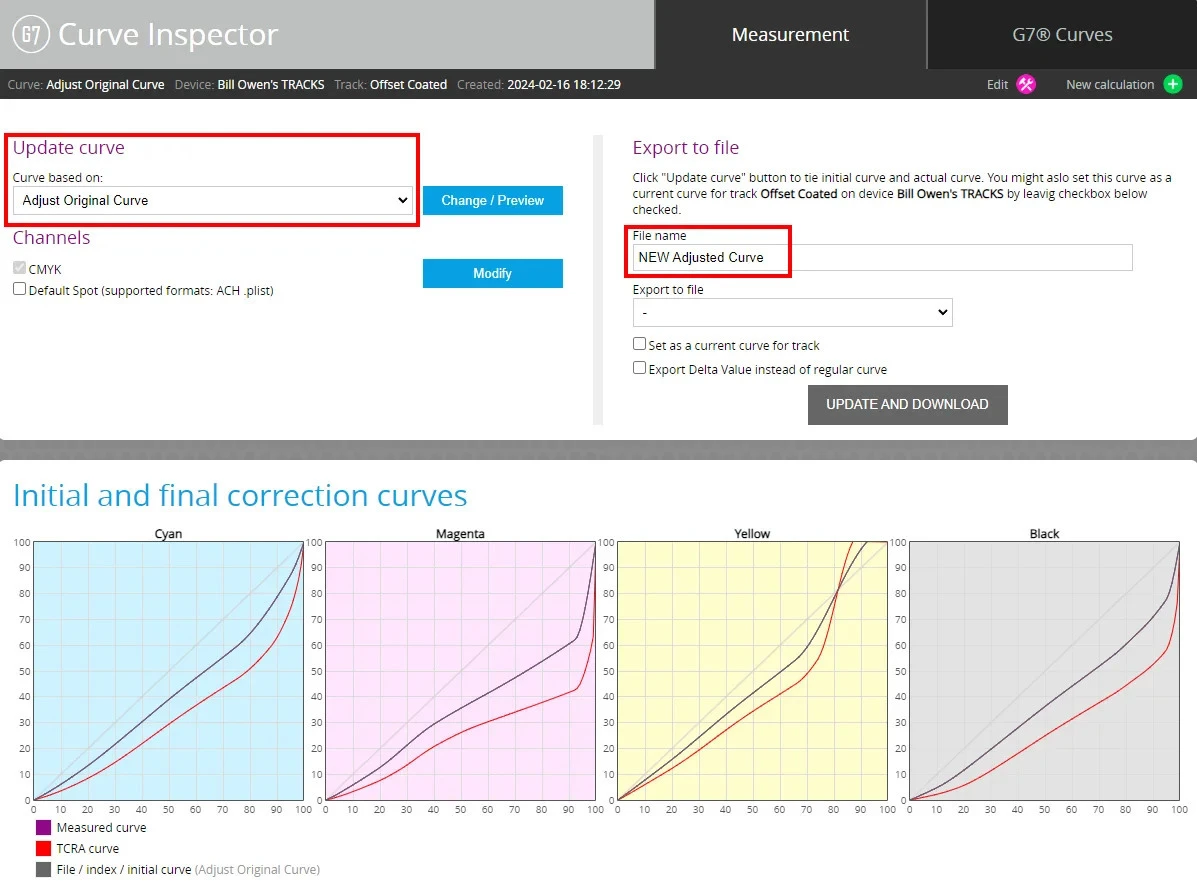
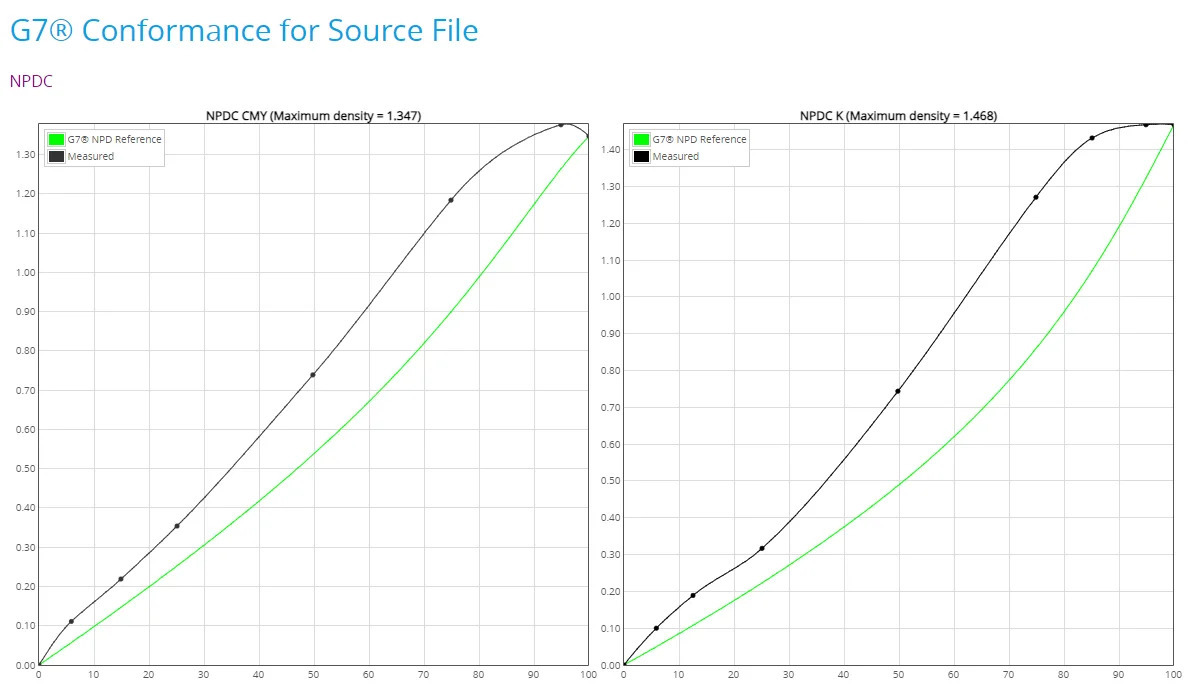
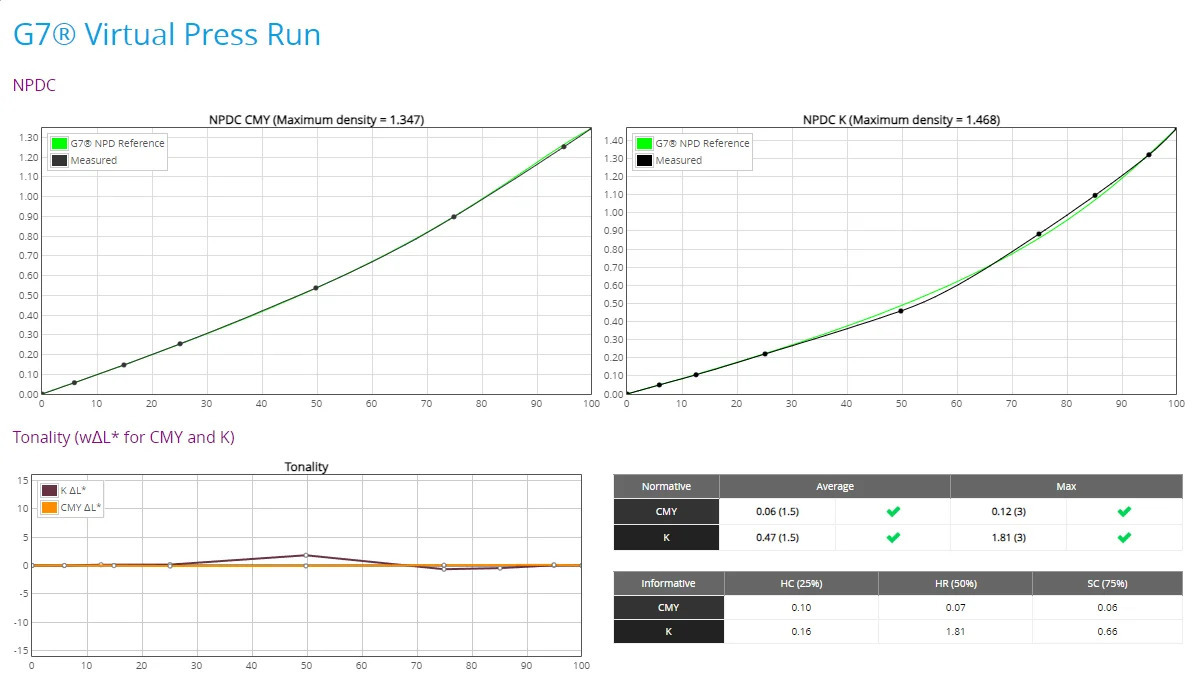
Have you ever needed to quickly adjust your press curves but didn't have time for a costly, time-consuming dedicated press run? There's a way to do exactly that — using measurements from jobs you've already run. Let me show you. This all happens in our Alder Color Control Platform, which offers many "inspectors" for taking full control of your color and quality-control needs. Today we'll focus on two: the Print Inspector and the Curve Inspector. Take a look at a press-sheet measurement in the file list within the Print Inspector. I named this one "Original Curve Needs Adjustment." Look at the vertical columns for CMYK, RGB, and G7. The CMYK specs are still passing — but the RGB overprints and G7 neutral gray are both failing with the current press curve. Let's fix it by making a new adjusted curve. Before you can take the measurements, you need to find or make room on a production job for either a 1-row or 3-row CC84 control strip. The CC84 uses all of the color patches necessary to create a G7 correction curve. This is the key point: the 84-patch Idealliance 2013 Control Strip does not contain all the colors needed to generate a curve. The CC84 does. (I go deeper on that difference in my post on the CC84 vs. the Idealliance control wedge.) You can take measurements from several jobs over a few days to gather enough data to average for even better curves. You'll also need a measurement device such as an X-Rite i1 Pro or another supported spectrophotometer. The software supports most current, popular models, including Nix and (until their recent discontinuation) Konica Minolta MYIRO-1 devices. Most print shops already have an X-Rite i1 Pro on site — use it. Here's a crude example of a layout that includes the CC84 3-row control strip in the gutter. It's best to place the CC84 vertically on the sheet, so it sits in only one ink zone — just make sure your press operator knows to pay particular attention to the ink zone(s) the CC84 is in. You don't have to place these in every job — but why not? At minimum you can measure them to check whether you're still passing G7 Grayscale or GRACoL Targeted. That way you're always ready to create an adjusted correction curve whenever necessary. Just grab a few recently run jobs and measure the strip. Choose a measurement file from your list by clicking the box to its left. (Select multiple files if you have more to average — you can evaluate the data and decide which measurements to include in the group.) I'm selecting just one for this example, then clicking the CURVE button at the bottom center, and Use Selected Files on the next screen. Look at the NPDC CMY and NPDC K curves. The black line indicates the current print condition, and it should be sitting on top of the green line. Our adjustment will correct that by bringing the black line down directly onto the green. (You typically wouldn't be nearly this far off when revising curves — I'm using an exaggerated example to clearly show the difference.) Give your new curve a name — I called this one "Adjust Original Curve" — use the settings shown for offset presses, and click CALCULATE. Once the adjustment curve is calculated, the Curve Inspector opens. This is where you select your existing curve under the "Update Curve" area — look in the upper-left "Curve based on" field and select your existing curve. (This assumes you already have an existing curve in the system — and if you don't, we can manually input your existing curve numbers.) With the new curve set to be based on the old one, give it a new name in the "File Name" field — I called this one "NEW Adjusted Curve." From here you can Export to file and choose your RIP — Kodak, Apogee, Fuji, and so on — or type the new curve numbers directly into your RIP software. But first, let's look at what this new curve is going to do. Scroll down until you see the G7 Conformance Curves: How do we know this will work — that the new curve is good? Our platform has a Virtual Press Run feature that shows you exactly how your files will print with the new adjusted curve. Scroll down to the "G7 Virtual Press Run" data: The software predicts how your new curve will print — assuming you print to the same densities as the previous run(s). Look how the black line now sits on top of the green. That's confirmation the new curve (based on your old one) will produce a passing G7 result and predictable print quality. This lets you skip verification runs, too. Consider what just happened. You didn't do a dedicated press run. You didn't hire a G7 expert to come into your shop. You didn't even do a verification run to confirm the result. You simply gathered press sheets from production runs that already had the CC84 strip in the gutter, measured them, averaged the data, and generated a new adjusted curve. Simple, right? We'd love to help you implement this. You can register for a free software trial, or contact Bill Owen directly. Lead Color Specialist, Alder Color Solutions Bill is an Idealliance-certified G7 Expert and founder of Elevated Color, with more than 45 years in prepress, printing, and color management — including over 25 years dedicated to helping printers achieve predictable, repeatable color across commercial, packaging, wide-format, offset, digital, and inkjet work. He specializes in G7 implementation, ICC profiling, press and monitor calibration, proofing systems, and workflow standardization, with deep experience across RIPs including EFI Fiery XF, PrintFactory, ChromaChecker, Onyx, Caldera, and Xitron Navigator, and platesetter workflows such as Agfa Apogee, Kodak Prinergy, Esko, and Heidelberg Prinect. His work has appeared in PRINTING United, Idealliance, and WhatTheyThink.Spotting the Problem in the Print Inspector
What You Need First: the CC84 Strip
And a Measurement Device
Placing the CC84 on Your Sheet
Generating the Adjusted Curve

Basing It on Your Existing Curve
Proving It With a Virtual Press Run
You Did All That Without a Press Run
Schedule a Consultation
billo@aldertech.com — 720-933-4413About the Author

Bill Owen
Phone: 720-933-4413