The Power of Wide Gamut Profiles!
How to use Wide Gamut CMYK profiles to achieve maximum color output.
The source profile is an ICC color management term/setting. Every RIP/DFE has a source profile and an output profile specified for color conversions. The default source profile in most cases is smaller than the gamut of the printing device and is therefore holding back color that could have been printed. Here I am showing how you can setup what I call “trick” workflows using Wide Gamut CMYK profiles.
The standard ICC practice in desktop applications and RIP/DFE settings is to honor embedded ICC profiles. So, if I’m a photographer (which I am) or a designer (which I also am) I prepare my work in a specific RGB or CMYK color space (Adobe Creative Cloud defaults are sRGB and US Web Coated SWOP) and if you honor the profiles I embed in my images I’ll get what I was shooting for. The problem is, the default choices are not ideal. Now, as a color management consultant, I fully understand this but the vast majority of people do not. Most people don’t realize they’re choosing a container of pixels that is smaller than what most printers can print for them. And, we can’t reach out to all of these people and teach them how to prepare their files correctly. But what we can do is not honor their embedded profiles and choose the profiles we want to assume as source instead.
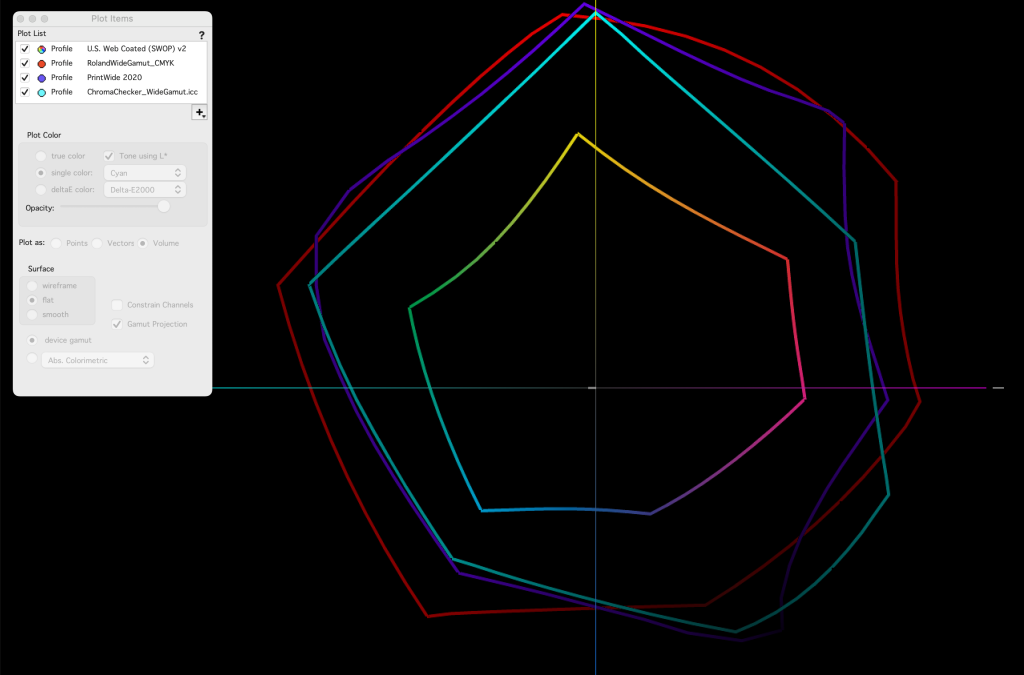
I call these “trick” workflows where you tell the software the image/file is coming from a color space that it was actually NOT prepared in – because the color space the images were prepared in isn’t ideal for utilizing all the color the printer is capable of producing. In the example below I’ve converted the evaluation images from RGB to CMYK in Photoshop the way most anyone would, by choosing Edit > Mode > CMYK. If using default color settings, this will convert all pixels into the US Wed Coated SWOP v2 color space (which is the lower right image below). Then, to illustrate this concept, I assigned 3 different wide gamut profiles – ChromaChecker_WideGamut, PrintWide2020 – Idealliance, and RolandWideGamut to illustrate what will happen in a RIP when used as the source/input profile.


Look closely at the images above. Lower right is the default CMYK conversion and represents what you would get if you honored embedded profiles. The other 3 other images represent what you would get by intentionally assuming the wrong source profile. You can clearly see that these different wide gamut CMYK profiles produce different results because of their differing shapes and sizes (see 2D gamut comparison above). Which one do you prefer? You can see in the Magenta image (top center) that the ChromaChecker Wide Gamut profile has changed the hue of Magenta to be more blueish and also the Red image (middle left). The blue image (middle right) looks oversaturated and even posterized in the gradient. The overall look of the RolandWideGamut profile looks totally natural and is my clear winner is this example.
Note to designers: You can use these wide gamut ICC profiles as your default CMYK Working Space in Adobe CC applications by choosing one in Edit > Color Settings.
Now, I’m not suggesting to use this “trick” workflow for all jobs but when you want to maximize the color output from an image/file that wasn’t created optimally, this is a fantastic option and can/will produce impressive results. Try this for yourselves and share your results in the comments. Simply duplicate one of your existing workflows, change the source profile to a Wide Gamut CMYK profile, turn off honor embedded profiles, and BAM! If you don’t have access to these profiles you may need to download and install them.

Feel free to contact me with questions – [email protected]

